[サンプルあり]AWS SESでメール受信を行い転送を行うプログラムの紹介

AWS SESを使ったメールプログラミングのご紹介です。
どうも^^、大学生アルバイトのカニミソです。
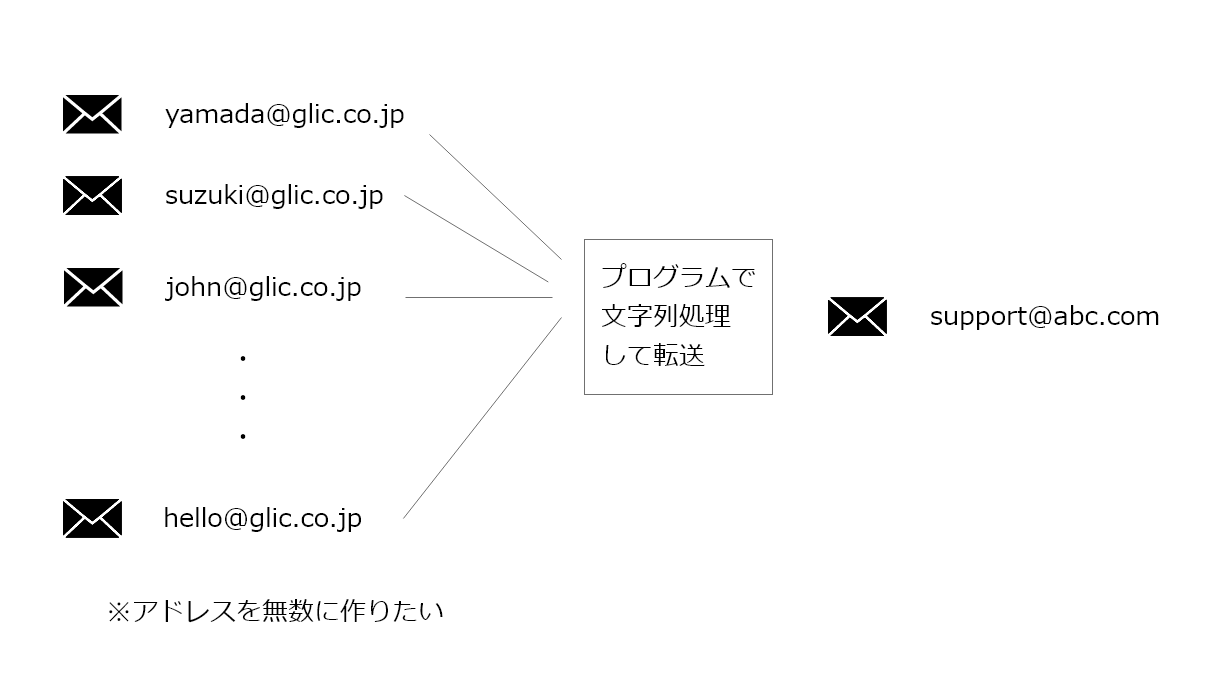
メールアドレスで「@」の前部分に色々な文字が入る状態でメールを受信し、一律特定のアドレスに転送する機会がありました。
AWSのサービス群の中でSES、S3、Lambdaを組み合わせることで簡単に実現ができるとの情報があったので、実際にAWSのサービスを利用してこれを実現するまでの手順とlambda上で使用したソースコードについてまとめました!
なお、システムの構成や設定手順は以下のサイトを参考にしています。AWSコンソール上での詳細な設定手順についてはここでは割愛しますので気になる方はこちらをご覧ください。
Forward Incoming Email to an External Destination
やりたいこと

いろいろなメールアドレスを大量に作成して(実際作成するわけではありませんが)、そこに来たメールをあるメールに一律転送することが目的のプログラムです。
これを実現する上での課題は以下の2点になります。
1)メールアドレスを大量にどのように用意するか
2)届いたメールの転送設定をどのように一括で設定するか
いずれも、一般的なレンタルサーバのメールシステムではこのような用途で提供されていないので実装が不可能です。そこでAWS SESの登場です。
メールをPythonなどのプログラムで2次的な処理を行うのにはうってつけのSESであればこれを実現することが可能です。
仕組み+処理フロー

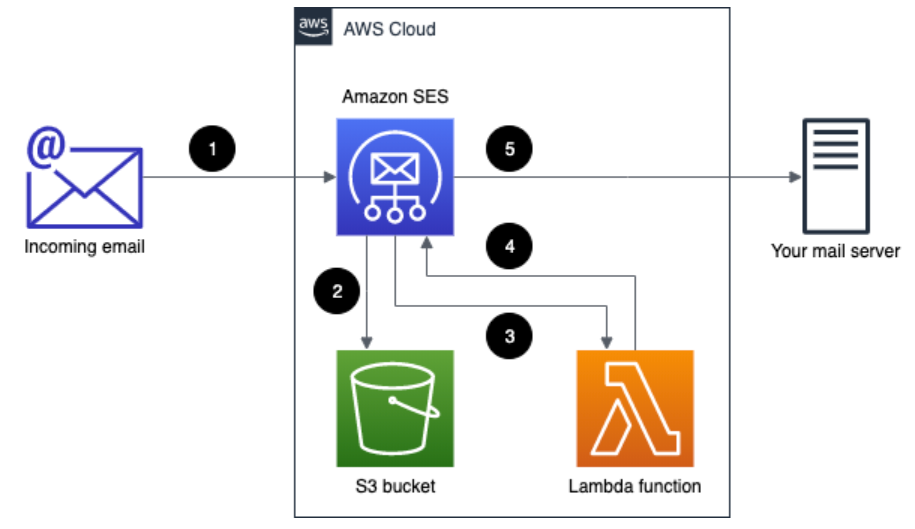
構成図(https://aws.amazon.com/blogs/messaging-and-targeting/forward-incoming-email-to-an-external-dest)
全体としてはSESでメールを受け取り、S3にメール本文を保存。最後にLambdaを使って受信したメール本文を取り出し、任意のフォーマットに加工して別アドレスにメール送信をする、という構成になっています。
大まかな設定手順
大まかな設定手順についてまとめておきます。
- 受信アドレスに使用するドメインのMXレコードの設定
- メール保存用のAmazon S3 バケットを作成する
- メール送信用のAmazon Lambda 関数を作成する
- メールの送受信を行うためにAmazon SESの設定を行う
※Amazon SES上でのメール認証が完了するまでに半日以上かかる場合がありますので早めに済ませておきましょう。認証が完了するまでメール送信のテストを行うことができません。
Lambda関数の設定(サンプルコード)
import os
import boto3
import email
import re
from botocore.exceptions import ClientError
from email.mime.multipart import MIMEMultipart
from email.mime.text import MIMEText
from email.mime.application import MIMEApplication
import email.header
region = os.environ['Region']
def get_message_from_s3(message_id):
incoming_email_bucket = os.environ['MailS3Bucket']
incoming_email_prefix = os.environ['MailS3Prefix']
if incoming_email_prefix:
object_path = (incoming_email_prefix + "/" + message_id)
else:
object_path = message_id
object_http_path = (f"http://s3.console.aws.amazon.com/s3/object/{incoming_email_bucket}/{object_path}?region={region}")
# Create a new S3 client.
client_s3 = boto3.client("s3")
# Get the email object from the S3 bucket.
object_s3 = client_s3.get_object(Bucket=incoming_email_bucket,
Key=object_path)
# Read the content of the message.
file = object_s3['Body'].read()
file_dict = {
"file": file,
"path": object_http_path
}
return file_dict
def create_message(file_dict):
sender = os.environ['MailSender']
recipient = os.environ['MailRecipient']
separator = ";"
# Parse the email body.
mailobject = email.message_from_string(file_dict['file'].decode('utf-8'))
# Create a new subject line.
subject_original = mailobject['Subject']
subject = "FW: " + subject_original
# Create a decoded subject text for body
subject_decoded, encoding = email.header.decode_header(subject_original)[0]
if encoding:
subject_decoded = subject_decoded.decode(encoding)
# get a bytes object containing the base64-decoded message
textbytes = mailobject.get_payload(decode=True)
# get the content charset
content_charset = mailobject.get_content_charset()
if(content_charset):
# decode the text to obtain a string object
text = textbytes.decode(content_charset)
else:
text = ''
# The body text of the email.
body_text = ("このメールは自動転送メールです。" + '\n'
+ "件名 : " + subject_decoded + '\n'
+ "受信アドレス :" + separator.join(mailobject.get_all('To')) + '\n'
+ "送信元 :" + separator.join(mailobject.get_all('From')) + '\n\n\n'
+ "以下本文" + '\n\n' + text
)
# Create a MIME container.
msg = MIMEMultipart()
# Create a MIME text part.
text_part = MIMEText(body_text.encode('utf-8'), 'plain', 'utf-8')
# Attach the text part to the MIME message.
msg.attach(text_part)
# Add subject, from and to lines.
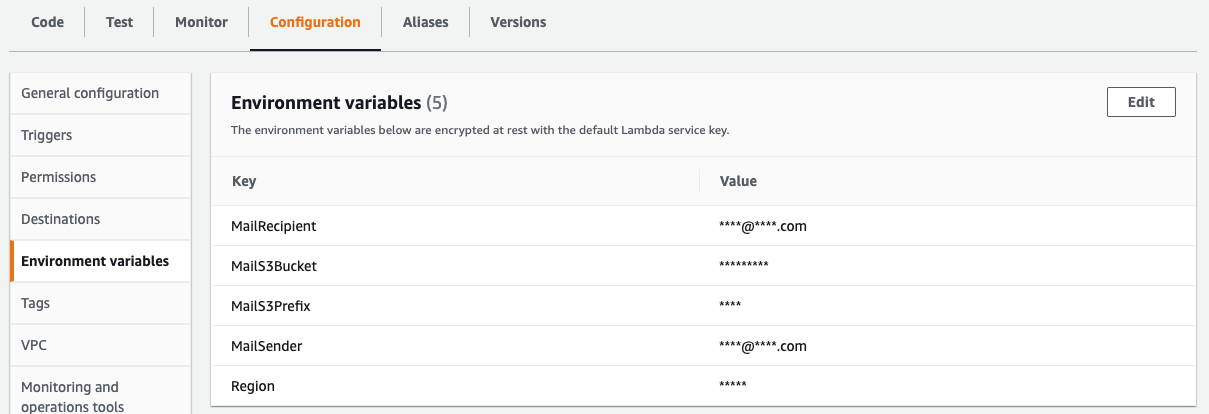
Lambda関数内で必要となる情報はLambdaメニュー内のConfiguration>Environment variablesで設定します。

※実際の画面では設定値が全て表示されます。
サンプルコードの解説
Forward Incoming Email to an External Destinationに掲載されているソースコードをベースとして
- 受信したメール本文を送信メールに加える
- 日本語(マルチバイト文字)に対応する
この2点を実現するために少し変更を加えています。
メール本文の取得
受信したメールをテキストとして取り出した後にpythonの標準パッケージである"email"を用いてメール内のデータの取り出しおよび加工をおこなっています。
メール本文の取り出しはcreate_message関数内の以下の部分でおこなっています。
textbytes = mailobject.get_payload(decode=True)
参考元はこちら:Python email.message_from_string() Examples
日本語(マルチバイト文字)の対応
メール本文や件名に日本語が入る場合は、元のテキストを取得するためにデコード処理を行う必要があり、create_message関数内の以下の部分で追加の処理をおこなっています。
# 本文に対してデコードが必要であれば処理を行う
textbytes = mailobject.get_payload(decode=True)
content_charset = mailobject.get_content_charset()
if(content_charset):
# デコード処理
text = textbytes.decode(content_charset)
else:
text = ''
# 件名に対してデコードが必要であれば処理を行う
subject_original = mailobject['Subject']
subject_decoded, encoding = email.header.decode_header(subject_original)[0]
if encoding:
# デコード処理
subject_decoded = subject_decoded.decode(encoding)
# メール本文作成
body_text = ("このメールは自動転送メールです。" + '\n'
+ "件名 : " + subject_decoded + '\n'
+ "受信アドレス :" + separator.join(mailobject.get_all('To')) + '\n'
+ "送信元 :" + separator.join(mailobject.get_all('From')) + '\n\n\n'
+ "以下本文" + '\n\n' + text
)
msg = MIMEMultipart()
# 送信メール本文の文字コードを指定
text_part = MIMEText(body_text.encode('utf-8'), 'plain', 'utf-8')
参考元はこちら
- Handling Encoded Messages with Python and imaplib - Stack Overflow
- PythonでGmailにメール送信してみた | 三鷹台でひきこもるプログラマの日記
- email - Python IMAP: =?utf-8?Q? in subject string - Stack Overflow
動作確認
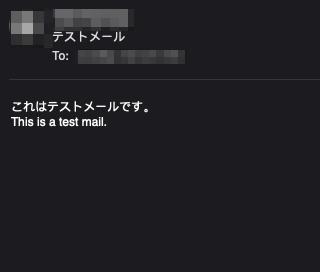
最後に今回のサンプルコードの動作確認をしてみます。

送信メール


 問い合わせ
問い合わせ


![[サンプルあり]カラーミーの共通テンプレートでグループの情報を表示(jQuery)](https://glic.co.jp/media/cache/article_list/uploads/0b/5a/0b5a62d823836b21059bbf69935638dc.jpg)
![[FAQ]WEBサイト制作・保守に関するよくある質問](https://glic.co.jp/media/cache/article_list/uploads/d0/46/d04609114f83f38d7053493e479df642.png)

